
Flex Classroom Instructions
Before Class
- Turn on the classroom computer, projectors, and TVs.
- Log in to the computer.
- Start the Teams meeting for your class by clicking the link to join.
- Turn on your video and audio. Ensure the camera and microphones are working.
-
- If Teams is not using the classroom camera, click ^ next to the video icon on the Teams taskbar and choose Black Magic WDM Capture to select the classroom camera.
-
- Open all PowerPoints, documents, videos, and other materials you will share during class.
During Class
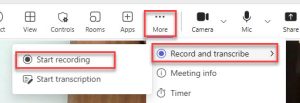
- To record your lecture, click ‘More’ > ‘Record and transcribe’, ‘ ‘Start recording’, in Teams.
- Share your screen. This will display simultaneously on the classroom projector and virtually on Teams. Remember to ‘Share Screen’ in Teams for all content you share so virtual students see it.
-
-
-
-
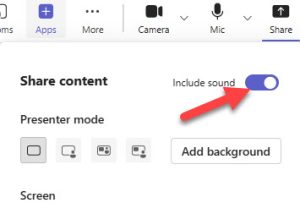
- To share a Video, click ‘Share’ and select your video under screen. Toggle the ‘Include sound” button at the top of the window to to ensure that remote students can also hear the audio.
- To use the Document Camera, click ‘Easy Interactive Tools’ on the desktop. Choose ‘Camera’ and then ‘Share Screen’ in Teams.
- Select ‘Avervision’ to use the document camera, if available.
- To share a Video, click ‘Share’ and select your video under screen. Toggle the ‘Include sound” button at the top of the window to to ensure that remote students can also hear the audio.
-
-
-
After Class
- When your class is finished, click ‘More’> ‘Record and Transcribe’> ‘Stop recording’.
- End the Teams meeting and close Teams.
- Sign out of the computer and turn off the classroom projectors and TVs.
Emergency Support
During your class time, contact Classroom Support at ext. 6111 or the I.T. Service Desk at ext. 7370.
FLEX Classroom Tips
Classroom Camera & Microphones
- Students attending virtually can be heard over classroom speakers when they talk. Ensure their mic is muted when they are not speaking.
- Students in the classroom can be heard by students attending virtually. Faculty and students should speak loudly and clearly so students attending virtually can hear them.
Camera Angles
- You can change the camera angle and zoom manually by using the camera remote control provided in the classroom. Use the zoom and arrow buttons to adjust the camera angle.
- The cameras have preset angles that can be accessed using the camera remote in the classroom. Press one of the number buttons on the remote to select a preset option.
Whiteboard Use
- When planning to write on the whiteboard, use a virtual whiteboard such as the one included in Teams to share with all students, including those attending virtually. If you write on the whiteboard using markers, virtual students cannot read it.
- You can also type notes into a Word processing software (e.g., Word, Google Doc) that you share in Teams so all students can view them.
Class Discussions/Group Work
- Teams breakout rooms can be used for group work or discussions. Create breakout rooms for virtual students and let in-person students group together in the classroom.
- You can use your laptop to join the meeting as a guest. Assign yourself as a co-host, and you can monitor the Teams chat, breakout rooms, etc., from your laptop.
Training & Additional Resources
Request FLEX Classroom training from the EdTech Team in the Hub prior to class.
Review the HyFlex Course Design and Teaching Strategies Pressbook for more information on designing and delivering quality HyFlex courses.